Friday, December 27, 2013
Sunday, December 15, 2013
One bird gets a plaster coat
DC124Garland cont'd.
So I gave one of the birds a coat of plaster (not the easiest thing I've ever done, even though I've been working with plaster for years and years). I've never been so hands on and as usual want things to be perfect. This is as smooth a coat as I could get, seeing as the plaster dries lightning fast. In the end he looks sort of rustic and I don't mind the roughness.
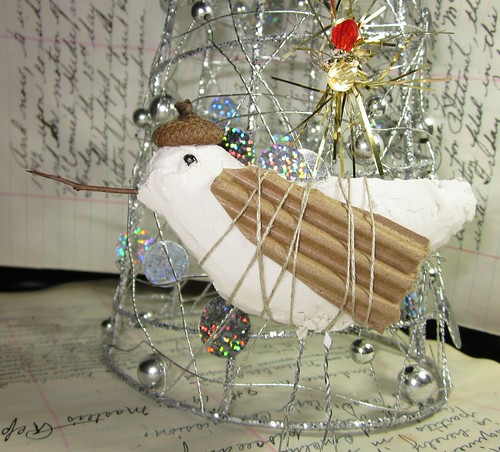
He is posing in front of a tree here, looking dapper in his hat, I think. My daughter is going to fall in love with him instantly when I show her later today so I'll be giving him as is, to her. I will work on another bird with giving it a coat of plaster and then applying a layer of paper strips in a papier mache fashion. That is my plan anyway. As this bird stands, he is pretty much like I saw in the magazine spread a few days ago.
I'll keep you posted. See you soon, I hope, hugs, Norma, x
So I gave one of the birds a coat of plaster (not the easiest thing I've ever done, even though I've been working with plaster for years and years). I've never been so hands on and as usual want things to be perfect. This is as smooth a coat as I could get, seeing as the plaster dries lightning fast. In the end he looks sort of rustic and I don't mind the roughness.
Saturday, December 14, 2013
Three birds make a garland
dc124: garland
There's a flock of flat paper birds laying to dry inside large heavy books stacked on the floor by my work table. They were to be a garland of birds in the end. But they will have to stay for awhile longer inside the books I'm afraid...for while waiting for them to dry, I came across a picture in a magazine that turned my world upsidedown.
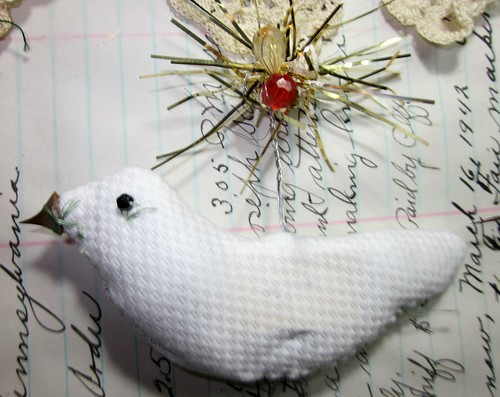
I'd been leafing through a magazine while waiting in the lineup at the craft store, and came across a picture that made my stomache leap and my heart thump at the same time. This picture was everything that I could have ever dreamed of, or imagined, but didn't. Some one else did. I thank them with all that I have to give in the way of happy gratitude. This person connected dots for me; my dots; that have been bouncing around inside of my brain for longer than I admit and with nowhere to go but to continue bouncing. So my garland offering for this drawing challenge will be my version of what I saw in the magazine. I put together three birds which will make my garland. They hang from a swath of old crochet.

Yes, they are unfinished in the photo, but time is of the constraint. I'm showing you their bones (or armature) because the next step is something I've never done before, and if I screw it up my birds are toast. The next step is to coat them in wet plaster, applied with a palette knife (I'll know better when I get to it.)

Meanwhile, here is my list of dots that were inside of my head:
1. Using rose thorns as beaks.
2. Using nails as beaks (I'd not thought of spines yet.)
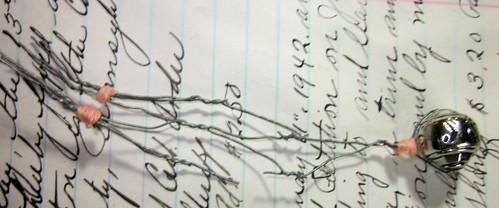
3. Using a metal hanging hook at the top of the bird that was connected inside to the feet/legs of the bird.
4. Using beads as eyes.
5. Using a cardboard weight chunk of paper inside of the bird shape where the metal bits are attached to make a mini armature. This is the absolute necessary step for my fairy birds which I've been making for years.
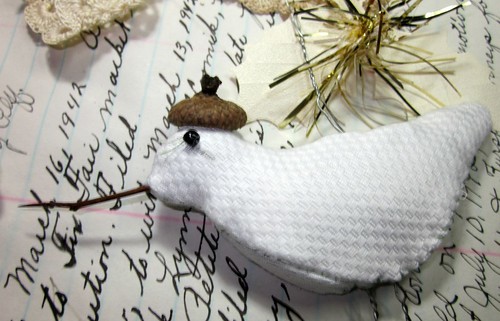
6. Using an acorn cap for a hat.
7. Stuffing the bird with soft fibre fill.
8. Putting sparkle on the bird.
9. Having a quote or word, either on the outside of the bird, or tucked into the inside. Every doll, bird, or thing I've ever made has a word or something on or in it. I cannot stand the idea that something that is real (it comes alive as I construct it) would have an empty head or heart or soul. (cue the spooky music) These birds have the words, love, faith, and gratitude inside of their little bodies.
10. Having the wings tied on. I've not done it, but seen it done and had made a mental note to add to my bouncing dots inside of my head.
11. Using plaster of paris. I've had a 25-lb. box of dental plaster (which I purchased for use in making molds) sitting around here for at least ten or more years. BUT I DID NOT THINK EVER, OF USING PLASTER OF PARIS ON THE BIRD ITSELF APPLIED FREELY ON THE OUTSIDE. This is not my idea and is the crucial turning point in my being able to connect all of the above dots together. I thank Debra Smith, whole heartedly for her talent and original art form. And, for giving instructions in the magazine. This year I did think of making snowmen and sewed an armature of stuffed fabric from upholstery samples, and had planned to cover it with paper strips for a paper mache 'look' that is described in the next point (12), but my daughter, when I showed her the armatures and described what I wanted to do with them, asked me about what would happen if mold occurred inside. It stopped me dead in my tracks.
12. I love the look of these birds but am going to take it a step further. For this point number 12, I have been wanting to create paper mache birds with the newspaper or strips of paper from old books showing clearly on the outside of the bird, and with tiny black dots for eyes. So I will be coating the plaster with an outside layer of paper strips and then perhaps a dusting of snow glitter, and I will have successfully (I hope) connected all of these bouncing dots inside of my head.
13. Of course you know that the absolute final step in the making of my birds, is that each bird will get 'banded' with its' own number. I am up to the 130s or thereabouts now.
While I was putting together these birds, I came across this (refer to point number 3 above) which is about three years old and has been banging around in my sewing basket all of that time, and has now lost the original shine of the chicken wire and taken on a dull patina. I never threw it out because I knew some day I'd be able to figure out how to use it. I had faith. Three years later...ta da!
Who is responsible for this drawing challenge fun? Nadine, of course! It was she that took on the role of host and given us this wonderful theme of 'garland.' Thank you friend! If you want to visit the folk who participated in this week's challenge, just pop over to tiny WOOLF where you'll be linked. Thank you for visiting today, and I hope to see you again soon. Norma, x
There's a flock of flat paper birds laying to dry inside large heavy books stacked on the floor by my work table. They were to be a garland of birds in the end. But they will have to stay for awhile longer inside the books I'm afraid...for while waiting for them to dry, I came across a picture in a magazine that turned my world upsidedown.
I'd been leafing through a magazine while waiting in the lineup at the craft store, and came across a picture that made my stomache leap and my heart thump at the same time. This picture was everything that I could have ever dreamed of, or imagined, but didn't. Some one else did. I thank them with all that I have to give in the way of happy gratitude. This person connected dots for me; my dots; that have been bouncing around inside of my brain for longer than I admit and with nowhere to go but to continue bouncing. So my garland offering for this drawing challenge will be my version of what I saw in the magazine. I put together three birds which will make my garland. They hang from a swath of old crochet.
Yes, they are unfinished in the photo, but time is of the constraint. I'm showing you their bones (or armature) because the next step is something I've never done before, and if I screw it up my birds are toast. The next step is to coat them in wet plaster, applied with a palette knife (I'll know better when I get to it.)
Meanwhile, here is my list of dots that were inside of my head:
1. Using rose thorns as beaks.
2. Using nails as beaks (I'd not thought of spines yet.)
3. Using a metal hanging hook at the top of the bird that was connected inside to the feet/legs of the bird.
4. Using beads as eyes.
5. Using a cardboard weight chunk of paper inside of the bird shape where the metal bits are attached to make a mini armature. This is the absolute necessary step for my fairy birds which I've been making for years.
6. Using an acorn cap for a hat.
7. Stuffing the bird with soft fibre fill.
8. Putting sparkle on the bird.
9. Having a quote or word, either on the outside of the bird, or tucked into the inside. Every doll, bird, or thing I've ever made has a word or something on or in it. I cannot stand the idea that something that is real (it comes alive as I construct it) would have an empty head or heart or soul. (cue the spooky music) These birds have the words, love, faith, and gratitude inside of their little bodies.
10. Having the wings tied on. I've not done it, but seen it done and had made a mental note to add to my bouncing dots inside of my head.
11. Using plaster of paris. I've had a 25-lb. box of dental plaster (which I purchased for use in making molds) sitting around here for at least ten or more years. BUT I DID NOT THINK EVER, OF USING PLASTER OF PARIS ON THE BIRD ITSELF APPLIED FREELY ON THE OUTSIDE. This is not my idea and is the crucial turning point in my being able to connect all of the above dots together. I thank Debra Smith, whole heartedly for her talent and original art form. And, for giving instructions in the magazine. This year I did think of making snowmen and sewed an armature of stuffed fabric from upholstery samples, and had planned to cover it with paper strips for a paper mache 'look' that is described in the next point (12), but my daughter, when I showed her the armatures and described what I wanted to do with them, asked me about what would happen if mold occurred inside. It stopped me dead in my tracks.
12. I love the look of these birds but am going to take it a step further. For this point number 12, I have been wanting to create paper mache birds with the newspaper or strips of paper from old books showing clearly on the outside of the bird, and with tiny black dots for eyes. So I will be coating the plaster with an outside layer of paper strips and then perhaps a dusting of snow glitter, and I will have successfully (I hope) connected all of these bouncing dots inside of my head.
13. Of course you know that the absolute final step in the making of my birds, is that each bird will get 'banded' with its' own number. I am up to the 130s or thereabouts now.
While I was putting together these birds, I came across this (refer to point number 3 above) which is about three years old and has been banging around in my sewing basket all of that time, and has now lost the original shine of the chicken wire and taken on a dull patina. I never threw it out because I knew some day I'd be able to figure out how to use it. I had faith. Three years later...ta da!
Who is responsible for this drawing challenge fun? Nadine, of course! It was she that took on the role of host and given us this wonderful theme of 'garland.' Thank you friend! If you want to visit the folk who participated in this week's challenge, just pop over to tiny WOOLF where you'll be linked. Thank you for visiting today, and I hope to see you again soon. Norma, x
Sunday, December 8, 2013
Winter Secrets
dc123: swanlights
Stefanie has sent me on a creative journey unlike no other. I went places far and wide, but in the end decided to make a new little accordion folded book with two elements that spoke to me the loudest. Namely swan and water (winter cold water.) These prompted the new design for my beloved hand made paper and sumi-e ink sticks and brushes which are of import in making a little book.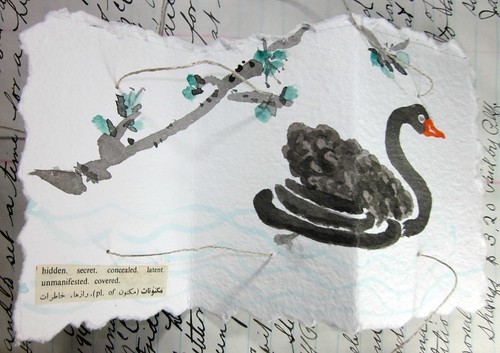
This is the design for the book which I will use as a guide. It is quickly done and I make no apologies. I need to practice my brush strokes as I haven't held a sumi-e brush for quite some time.
And my stamp ink (red) is almost all dried up. Time for a new one of those.
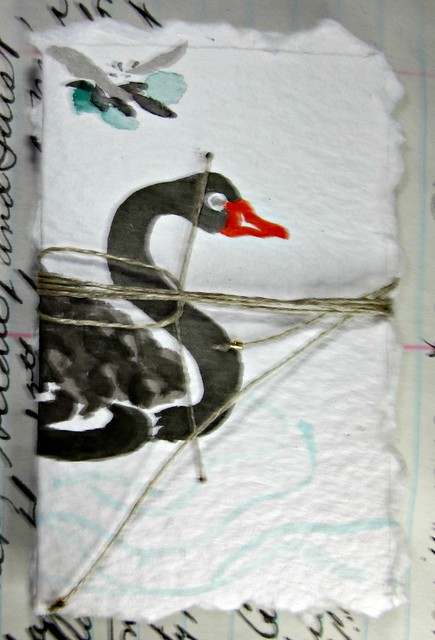
Here is a close up of my black swan.
 As it passes under a winter plum branch in the icy cold water, it leaves secrets behind. Perhaps buried under the water.
To view more art contributions with this theme and for this drawing challenge please visit Stefanie's blog where you will be linked. Thank you so much dear friend for taking me on such a wonderful creative ride.
Thank you for dropping in today. Hugs, Norma, x
As it passes under a winter plum branch in the icy cold water, it leaves secrets behind. Perhaps buried under the water.
To view more art contributions with this theme and for this drawing challenge please visit Stefanie's blog where you will be linked. Thank you so much dear friend for taking me on such a wonderful creative ride.
Thank you for dropping in today. Hugs, Norma, x
Stefanie has sent me on a creative journey unlike no other. I went places far and wide, but in the end decided to make a new little accordion folded book with two elements that spoke to me the loudest. Namely swan and water (winter cold water.) These prompted the new design for my beloved hand made paper and sumi-e ink sticks and brushes which are of import in making a little book.
This is the design for the book which I will use as a guide. It is quickly done and I make no apologies. I need to practice my brush strokes as I haven't held a sumi-e brush for quite some time.
And my stamp ink (red) is almost all dried up. Time for a new one of those.
Here is a close up of my black swan.
Subscribe to:
Posts (Atom)