Monday, April 30, 2012

The Reveal...

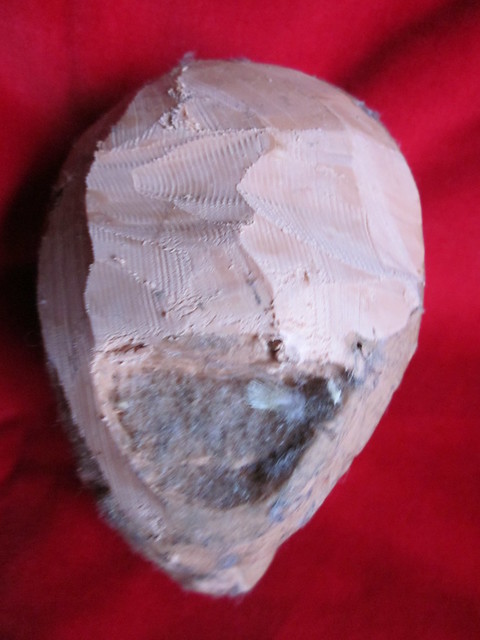
Well there is bad news AND good news! So I'll start with the bad and end on a good note. Here's the air dried tub of plaster of paris. Note that there is a largish air hole in the middle. When I poured this second layer of thin plaster, I rushed it and didn't pay attention to air bubbles. Normally I'd gently shake the tub to allow bubbles to come to the surface and then pop them. Dried air holes mean holes in the plaster. Sometimes I take a small bit of wet plaster and coat the surface of the plasticine first and then pour the bulk of the plaster on top of that. In any event, this is what I have to work with.
I pried off the plastic tub from the dried plaster and found that the first layer that was the texture of ice cream in fact didn't do much at all as far as actually filling in the plastic form I was using. So it is as unstable as all heck.
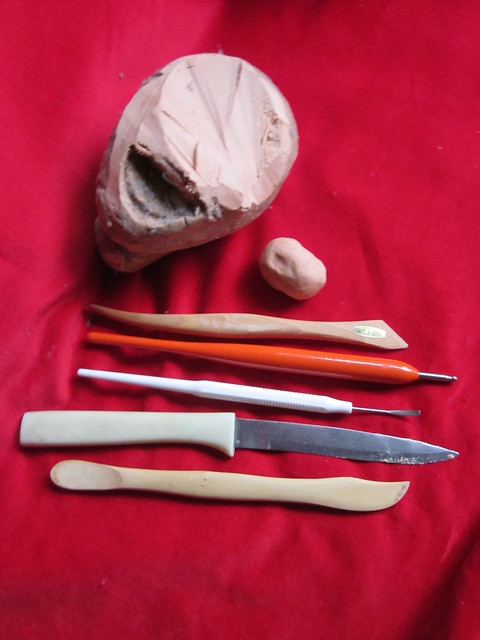
In any event, I have to separate the two layers of dried plaster to get the two-part mold. Normally I use a metal chisel with a wide edge and tap it all around with a rubber mallet, going all around the outside where I can see the two sections of plaster meet. Here, however, I'm using a screw driver because I am not fussy.
So the two sections of dried plaster have been separated and this is a two part mold you are viewing.
Normally I'd dig out the plasticine completely freeing it from the mold. Then I'd let the 2 mold pieces dry further and knowing me I'd be wanting to use them so would likely bake them in a very very low oven or on top of a rack, stove top. But I can tell that this mold is unuseable because the face indentation in the mold is not up to scratch. For starters it isn't a large area to work with, and second, to add insult to injury, there are air bubbles which further destroy the small area there was in the first place. 
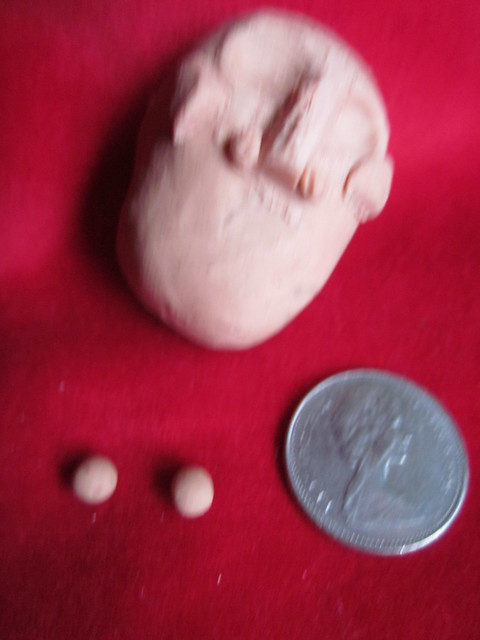
AND HERE IS THE GOOD NEWS! The fella's face hasn't been destroyed. I can release him in one piece away from the plaster, and rework him; then pour another mold from him! He will live to tell the story of his birth.
Here is a close up of his mug. I'd taken the screw driver and gently tapped alongside the plasticine and it does release. You know it it so interesting. Each sculpted piece takes on a personality and I get emotionally attached to the figure. I would have been sad to see this guy go. So there it is. I will be pouring another mold and when I get to this stage again (with a useable mold) I will come back and show you how to use the plaster of paris two-part mold. I'm going to see if I can round up some sort of chocolate around here to celebrate. Thanks for popping in, and we'll see you soon I hope! *smiles* Norma

Sunday, April 29, 2012

Horse Feathers

DRAWING CHALLENGE: hosted this week by: Patrice. Each week a new theme is posted, hosted by someone new, and everyone is welcome to join in! This is my first entry with the theme: E-A-R-T-H-L-Y.
Yesterday I discovered a random tree growing in the boulevard in a forgotten and neglected section of the roadway near where I live. It would have been mowed right down with those huge lawnmower machines the City landscaping crew use so I tugged at it and it released easily into my hand. Attached to the lowest part of the stem (will become a trunk) was the split chestnut that had developed into the tree. I took it home and plunked it in a small jar of water for now. Then today I decided to draw a quick sketch of the tree on used tea bag paper so I propped the tree against the nearest object in front of the window where there is good light. I did a quick sketch and then added some colour with pencil crayons and watercolor. Here is the drawing.
When I went on line to find out the name of the tree, I discovered that it was called a 'Horse Chestnut' tree and that was kind of neat because I'd propped it up against the horse figure not knowing the name of the tree. Then when I drew a leaf up close, the sections reminded me of the way feathers fall so the idea of horse feathers came to me. The leaf looks like a group of feathers that may be used as a decorative element for a horse.
So I am calling this post horse feathers even though the meaning is not so nice. See you soon I hope, *smiles* Norma

Tiger Balm to the rescue...perhaps!

Well the proof is in the pudding they say. Or, maybe it was tiger balm. We'll see. Here we have the fella on stilts so he is elevated for the pouring of the plaster of paris into a mold. It will be a two part mold so I pour the bottom layer in first up to about the middle of the head part. I think he is quite handsome at this angle.
I've placed him into a plastic tub and poured the first part of the mold. DISASTER. It was late. I used poor judgement. I knew better. When you pour a mold like this using plaster of paris, the plaster should be like runny yoghurt. Really runny yoghurt. My mixture was like icecream. I knew this was not right. I poured anyway. So instead of a nice runny steam of liquidy yoghurt, I got chunks of ice cream plopping in and drying into chunks of hardening plaster in mid air. DISASTER. So our fella looks a bit frightened and frankly he should be. This may be the last we see of him. For I may not be able to save him.
I let him rest over night as I'd already made one bonehead move and didn't want to make another whopper. So today I am fresh and ready to proceed calmly. Usually at this point I coat the poured bottom part of the mold with a nice thin layer of vaseline (I have a dedicated jar for this) and I couldn't find any vaseline in the house at all. But I found a jar of WILD TIGER balm. Stinks to high heaven but it is vaseline basically so I'm going with that. Now, under normal circumstances the surface of the poured mold is a smooth as glass and you just paint on a very thin film of vaseline on to the plaster and also on to the plasticine. Sometimes I gently coat the plasticine with my finger tips. But as you can see, this plaster is like dried volcano rock. I'm going to slither on the vaseline with a brush as best I can.
Once I've coated the mold I will mix up another batch of plaster of paris and pour that on top and let it dry over night so it is really hard. And tomorrow we will have the reveal. Until then, thanks for dropping by. Notice that I've cleaned off the remaining fuzzy chunk of plasticine and sliced it into pieces so it is ready to begin sculpting another head right away if this mold is a throwaway. See you soon I hope, *smiles* Norma

Saturday, April 28, 2012

Hello World!

Well I completed the sculpted head as far as I am going to complete him. It's supposed to be a girl but sure looks like a boy. It reminds me of that song from the 60s "Are you a girl?...or are you a boy? The first thing I saw when I got up this morning was this, waiting for me, looking very sad.
So I started in on him. I'm calling him a him from now on. I needed to complete his mouth.
So I worked on the mouth as much as I am going to, and started in on the eyes. I built up an eye bone (I don't know the name of this bone) to make a socket sort of.
I'm satisfied with the eye areas and really, nearing the end of the sculpting of him.
He needs a neck proper and the general shaping of shoulders.
So he is completed. Remember that hideous lump with feather and dirt/dust embedded plasticine? Well I've taken what I need to make my little man head. The rest will be reclaimed to be used to make a dam for when I pour a mold of the fella. That will be next post.
Thanks for dropping in, we'll see you soon I hope. *smiles* Norma

Friday, April 27, 2012

Sculpted face continues...

So it's back to sculpting and I'd originally planned to sculpt a face to make a mask really, to just sew on to a prim doll but once I got going I decided to make a full head with neck and shoulder area just like the old fashioned porcelein doll heads one sees in magazines. Here's the face as I left it two days ago.
I started to add the neck and as a result have squished the mouth completely.
Here I've widened the shoulders and have added bulk to the head.
Now I'm starting to rework the mouth.
Just continuing on the mouth and starting to pay attention to the eyes.
So I worked on this for only an hour or so this morning and left it at that. Tomorrow is another day! Thanks for dropping in and we'll see you soon I hope! *smiles* Norma

Wednesday, April 25, 2012

Owl painting completed and ready to mail

Now I just need to pop this fella into an envelope and it is off to New York City!
I like how the crocheted 'soft' frame looks in the final piece. Thanks for dropping by and we'll see you soon I hope! *smiles* Norma

Monday, April 23, 2012

LOVE YOUR SELF

This is the title of my newest painting in acrylic and mixed media. It is my 5" X 5" art piece in response to Seth's call for art.
As you can see I've started to crochet a border around the outside edge which will be the 'soft' frame. I've combined art with craft and view it as a sort of art/craft matrix in that within the art there is craft and within the craft there is art. I cut a chunk of painted canvas from one found in the dumpster and so I'm using the exact original painting for the background. I'm painting right over top of it for the owl which is my own contribution to the canvas. In this way I see it as a recycled piece, as well as a 'crafty' piece. I designed a chest piece which is meant to be literally untied by the viewer. In order to see what lies hidden within the chest of the bird you have to actually work at it to get there. When you do you will see the words LOVE YOUR SELF.
The words will be hidden behind the chest piece once it is in place.
The chest piece in position. This is an earlier shot. I've sinced done more painting on the piece.
Here is the art in its planning and very beginning stages. I've chosen the image I want to paint, and have installed the grommets so they align.
So what is this message LOVE YOUR SELF? It came as a sort of unravelling of my own self in my experience of viewing art for 31 days straight which Seth thoughtfully provided for us all. Every day my heart strings were being tugged at and I felt love for what I saw on screen. I felt love for all of the pieces that I saw and all of the artists that I met and I became in love with my own art as I was inspired to do it, and love for all of my own art that I have struggled to make in the past and then that love grew into a love of me and so the words came to me one night...make art, love art, love your self, love the universe. Simple. So I began to think of a chest with the words inside of what is felt (the heart area) and of an unravelling of that message and the heart strings being pulled and so that others would pull the strings to untie them to see what is there. The string theme grew as I worked on the piece so that in the end I decided to do a soft frame of thread (crocheted). So that is my response to the call for art and I hope I get it done before the deadline! I have some crocheting to do!! Glad you popped in and we'll see you soon, I hope, *smiles* Norma

Sunday, April 22, 2012

The best laid plans...

For some time now my fingers have been itching to do some sculpting. I love sculpting and haven't done it for such a long time. Years in fact. So when I came across this chunk of forgotten and abandoned work, I knew I had to get busy. This was going to be a puppet head and is a scary looking laughing character. It got very squished and very very dusty and even has my budgie bird feathers embedded into the plasticine. Overall, a very disgusting thing.
I began by scraping off the top layer in the largest smooth area which happened to be the original eye area and then digging out some fresh plasticine underneath to reclaim it.
Then I gathered the bits together into an oval to start, and found some sculpting tools laying around here.
Now we see the oval with eye areas dug out and a sort of nose piece.
Now I've added little bits of clay for the beginnings of the cheek bones, and two little balls that will be incorporated into the nose to widen it at the bottom. See those two balls that are laying separately? Those are the eyes. They'll be popped in later. I added a thin dime to show the scale.
The eye cavity has been widened and the eyes popped in to place. They will take shape. Also, the egg form was very widened with a chunk of clay added to the forehead and top of head sections.
I know that my photography skills are lacking. I really need to get a camera stand to make things all steady. So this was a sculpting session that was way fun and got me started. Sadly, I have to stop to finish something (a painting) that has a deadline. But I'll show you the continuation of the sculpted piece as I get back to it. Thanks for dropping by, and we'll see you soon, I hope! *smiles* Norma

Wednesday, April 18, 2012

Pink tears [WOYWW150]

Diana's tears are of the same colour as her favourite flowers.
Yesterday I was visiting one of my most enjoyable sites and read that this person's art was done using her non-dominant hand and that was like a firecracker under my behind. I jumped up, grabbed one of my arty type books that I rip apart to use for projects (it happened to be Romeo and Juliet) and a box of watercolors and some pencil crayons and I didn't move from the spot until I got this far in the drawing. It is enough to see what my non-dominant hand would produce. I like it. It's free and loose. I'll do more of this style in future.
Here's my work desk scene. I worked directly on top of my lap top. Not smart!
Today at Julia Dunnit's fabby blog she features every Wednesday, artists from all around the world who show what is on their work desk. Thanks for dropping by! Be seeing you soon, I hope, *smiles* Norma

Monday, April 9, 2012

littlebuddha

Today I'm painting little buddha faces on to used tea bag paper with acrylic paint.
I love his curlicue hair.
This painting is small (about 1.5" X 2.5") and for some parts I used a magnifying glass to get detail. Thanks for dropping in. We'll see you soon, I hope! *smiles* Norma

Saturday, April 7, 2012

ART happens

Today I am practicing painting buddha faces. I'm working small and just playing basically. I'd arrived at the point where I was happy with my results and ready to take a break and maybe pack up for the day. Laying on my art table were the throwaway bits and I was just about to scoop them into the garbage bin when I realized that I could pop them on to a rolodex card for an altered rolodex art card. So I grabbed a blank card and collaged the throwaway bits onto the card and then added a word and an edge of other throwaway paper that I keep in a small box ready for times like this. Here is one page of the rolodex card (untrimmed) and also the bit of printed transparency that my daughter threw away and I nabbed. This transparency will make up the larger part of the reverse side of the card.
I just really liked the look of the ART that happened with the printed transparency laying beside it on the table. It's all serendipity isn't it? Nice to see you again. We'll see you soon, I hope, *smiles* Norma

Friday, April 6, 2012

friends


friends a video by angelsinmysecretgarden on Flickr.

Firuzan creates a secret garden where she lives in Turkey. The birds around there know all about it and they come to stay. Generations of doves have come. Look at this beautiful world!

LinkWithin

Related Posts Plugin for WordPress, Blogger...